Showing posts with label dessert. Show all posts

Sunday, June 5, 2011

Diary of a Secret Housewife: Banana Cake with Chocolate Cream Cheese Frosting

Sing it with me: "This cake is bananas.  B-A-N-A-N-A-S.  This cake is bananas.  B-A-N-A-N-A-S."  

It's also chocolate.  And cream cheese.  And caramel.  But mainly it's bananas.  And it's delicious. 


I had a bunch of ripe bananas hanging out in the fridge the other day, and I decided that they needed to be made into a cake.  I found a well-rated banana cake recipe on Epicurious, and decided to amp it up with the addition of chocolate chips and a chocolate cream cheese frosting that is still a bit tangy, not too sweet.  And I added some caramel on top too, just because I could.  The result is a decadent, flavorful cake that puts banana bread to shame.


Ingredients for the cake:


2 1/4 cups cake flour
3/4 teaspoon baking soda
1/2 teaspoon baking powder
1/2 teaspoon plus pinch of salt
1 cup mashed ripe bananas (about 2 large or 3 small/medium)
1/4 cup buttermilk
1 teaspoon vanilla extract
1/2 cup (1 stick) unsalted butter, room temperature
1 1/3 cups sugar
2 large eggs
3/4 cup chocolate chips
+ 2 more large bananas, sliced (for filling)


Directions for the cake: Preheat oven to 350°F. Lightly butter two 9-inch-diameter cake pans with 2-inch-high sides; dust pans with flour.. Combine cake flour, baking soda, baking powder, and 1/2 teaspoon salt in medium bowl. Mix mashed bananas, buttermilk, and 1 teaspoon vanilla in another medium bowl. Using electric mixer, beat 1/2 cup butter and the sugar in large bowl until blended. Add eggs 1 at a time, beating to blend after each addition. Add dry ingredients alternately with banana mixture in 3 additions, beginning and ending with dry ingredients and beating just until blended after each addition.  Mix in the chocolate chips.  Divide batter equally among prepared pans.

Bake cakes until tops are just beginning to color and tester inserted into center comes out with a few crumbs attached, about 20 minutes. Cool cakes in pans on racks 10 minutes. Using small knife, cut around cakes to loosen; turn cakes out onto racks and cool completely.

While the cakes are cooling, make the frosting.


Ingredients for frosting:

12 oz. cream cheese (about 1.5 sticks), at room temperature
1 cup (2 sticks) unsalted butter, at room temperature
1 1/2 cups confectioner's sugar
1 cup unsweetened Dutch processed cocoa powder

Directions for chocolate cream cheese frosting: Beat cream cheese and butter until light and fluffy.  Beat in 1 tablespoon vanilla and a pinch of salt.  Add in the chocolate powder.  Gradually beat in the confectioner's sugar.  (The frosting should still be tangy and cream-cheesy, but with a slightly sweet edge.  If you like the frosting sweeter, you can add up to 3 cups of confectioner's sugar.)  Put in fridge for 15-20 mins. until frosting is firm enough to spread.


Now fill the cake: Spread a thin layer of frosting on the top of one layer of the cake.  Place the sliced bananas  in an even layer over the frosting.  Then spread a thin layer of frosting on the bottom of the other layer of cake.  Put this layer over the first layer, so that the two cake layers are sandwiching the frosting/banana filling.

Next, frost the rest of the cake.  Add, if desired, a thin layer of homemade or store-bought caramel (I used Trader Joe's salted caramel spread).  Cover and chill.  Let stand at room temperature for one hour before serving.


Consume cake for breakfast, lunch, dinner, and dessert.  Be very, very happy.

Read more...

Sunday, May 8, 2011

Diary of a Secret Housewife: Passion Fruit Shortbread Bars

Outside it is a dreary, rainy day in Boston.  Here in my kitchen, though, it's downright tropical.  Sure, it's a balmy 75 degrees because my oven's been on.  But really the island atmosphere comes from these passion fruit shortbread bars, which burst with the taste of summer and sunshine.


I got my hands on some frozen passion fruit puree (Goya brand) the last time I was at the local hispanic grocery, and I've been looking for the perfect recipe to showcase the bright, fragrant flavor of passion fruit ever since. Then I had a lemon bar the other day and got inspired: perhaps I could make a similar dessert with passion fruit?

The results were even better than I expected!  The bars are tart, sweet, aromatic, sticky, and so, so delicious.  And they boldly kick the ass of any pedestrian lemon bar.


Passion Fruit Shortbread Bars

Step 1: Make shortbread crust (adapted from Martha Stewart's Raspberry Crumb Bars)


Preheat the oven to 350.  Butter a 9 x 13 baking pan.  Line with parchment paper, and lightly butter the parchment as well.  Set aside.

In a large bowl, whisk together 5.5 ounces ground almonds, 1.5 cups flour, 1/2 cup sugar, and 1/2 tablespoon salt.  Cut in 8 oz. butter with a pastry blender until the mixture resembles coarse crumbs.  using your fingers, squeeze the mixture together to create pea-size crumbs with a few larger clumps.

Transfer crumb mixture to prepared baking pan.  Cover with a sheet of parchment paper.  Using the back of a large spoon, press dough evenly into pan, lifting the parchment occasionally to ensure it doesn't stick.  With a wine bottle or small rolling pin, roll along the length of the pan to smooth dough.  Dough should be firmly packed, with no holes or cracks.  Bake, rotating the pan halfway through, until lightly golden all over, 15 to 20 minutes.  Transfer pan to a wire rack to cool.

Step 2: Make passionfruit filling (adapted from use real butter)


Reduce the oven temperature to 325°F.  Whisk or beat 6 large eggs until frothy.  Whisk in 2 cups sugar, about 1/4 cup at a time.  Then beat in the 1/4 cup plus 2 tbsps flour and 1.5 tsp. baking powder until well-mixed.  Pour 2/3 cup passion fruit purée and whisk or beat until thoroughly combined.

Pour the filling over the crust in the baking pan and bake for 30-35 minutes until the top of the bars are golden brown and the center is firm.  Cool completely and refrigerate for 3+ hours before slicing.  Serve with a dusting of confectioner's sugar.

Read more...

Sunday, March 6, 2011

Diary of a Secret Housewife: Flan Imposible

One of our friends had a tapas party for her birthday this weekend, and I couldn't think of a tapas recipe that would travel well, so I decided to make a flan.


But not just any flan.  (Insert "Mission Impossible" music here.)  Flan Imposible.


Flan Imposible, or Chocoflan, is really two desserts in one: velvety vanilla custard over a layer of gooey chocolate cake.  It gets its name from the magical process by which the custard and cake layers switch positions during baking.  With not too much work, you get two desserts and entertainment!

The recipe I used is Fany Gerson's, reprinted in Saveur, though this is a classic Mexican dessert, so many versions of the recipe abound, including ones that use cake mix (if you want Chocoflan in a hurry).  The centerpiece for this flan is cajeta, which is a goat's milk version of dulce de leche.  Unfortunately, even though we live mere blocks from the so-called Latin Quarter of Boston, I could not find cajeta anywhere.  So I used dulce de leche instead.  Really, though, you could just use a store-bought caramel sauce.  It'll still be good.  In fact, next time I might just make a quick caramel sauce at home; I think a less sweet, more bitter, almost burnt caramel would go really well with the sweetness of the flan and cake.


Preheat the oven to 375°F.  Lightly grease the bottom and sides of an 8-inch cake pan, or you can use a bundt pan, which I think is prettier.

Pour 1/2 to 1 cup of the cajeta (or whatever kind of caramel sauce you're using)  over the bottom and sides of the cake pan using a brush or the back of a spoon (you can heat the sauce very slightly in the microwave so that it is easier to spread).  If you love caramel, you should go all out and use a full cup of it.  But the dessert is plenty sweet already, so I used just enough to coat the pan.


Then make the cake layer.   Combine 3/4 cup sugar, 3/4 cup flour, 1/3 cup unsweetened cocoa powder, 1/2 teaspoon baking soda, 1/4 teaspoon baking powder, and a pinch of salt in a large bowl and whisk until well blended.  In a separate bowl, whisk together 1/2 cup buttermilk, 3 tablespoons vegetable oil, 1 egg (at room temperature), and 1/2 teaspoon vanilla. Add to the flour mixture, whisking until thoroughly combined.  Pour the cake batter into the pan and set aside.


Then make the flan layer.   Combine 12 ounces evaporated milk, 14 ounces condensed milk, 4 eggs, 1/2 teaspoon vanilla, and 1/2 teaspoon salt in a blender and blend until there are no visible lumps. Pour gently over the cake batter.


Cover loosely with foil, place in a large baking dish, and fill the baking dish with hot water so that it comes halfway up the sides.  Bake until a toothpick inserted into the center comes out clean, about 50 minutes.  (I forgot to cover with foil, so there was a thin layer of flan that remained at the top.  Grr.)


Remove the cake pan from the baking dish and allow to cool for at least 4 hours or refrigerate overnight. To unmold, lightly pass a warm knife around the edge, place a plate or dish on top, and carefully but rapidly flip over.  Garnish with toasted nuts or fruit.  Serve cold or at room temperature.


This is a super easy recipe, but trust me, people will be impressed by your flantastic baking skills.  And this dessert not only travels well, but is super tasty the next day.  Be sure to save yourself a slice though; it goes fast, and is very addictive.

Read more...

Wednesday, January 26, 2011

Eating Singapore: Desserts

It's an icy, slushy mess outside on another ugly Boston winter day.  But here on my blog it's still 88 degrees and a perfect time for icy desserts!


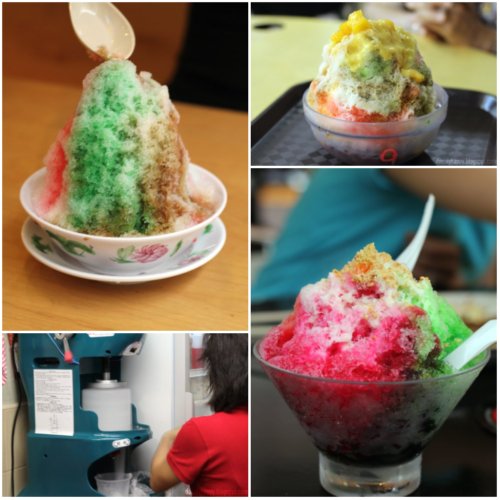
Since it's hot all year long in Singapore, it stands to reason that the most popular Singaporean desserts are  served over ice.  While I'm not a huge fan of icy desserts, my mom and sister have a seemingly insatiable appetite for this stuff.  My mom's favorite is cendol, which is made with coconut milk, shaved ice, palm sugar, and syrup.  The funky-looking green substance on top is a jelly made from pandan leaf and rice flour.  It's like a more sophisticated, chewier, and more filling snow cone.


My sister, however, loves ice kacang, which is also a dessert that involves shaved ice, flavored syrups, and red bean.  As evidenced by these photos, we had a lot of ice kacang.  Some places serve it with corn, others with mango or durian, still others with red beans, grass jelly, aloe vera, attap chee (palm nuts), or even ice cream.  All, however, begin the same way: with a huge bowl of ice that is freshly shaved off a cylinder (like an icy version of gyro, no?).


If you like your ice with more fruit, the above dessert, from Blue Ginger, is a shaved ice topped with coconut and calamansi, a citrus fruit.


And this version from the Maxwell Food Centre has mango, mango syrup, aloe vera, and attap chee.  I'm a huge fan of attap chee, which is the translucent, jelly-like fruit of the nipah palm; it doesn't have a strong flavor -- maybe a hint of coconut -- but it's got a very satisfying snap, sort of like eating a gummy bear that's been refrigerated for a while.


My favorite icy dessert from this trip, though, was probably gula melaka, which has sago (a tapioca-like substance), palm sugar syrup, and coconut milk.  It has a rich, caramel-like taste, and the sago is chewy and gives the dessert a bit more texture and heft than the versions that have only shaved ice.

Are you a big fan of iced desserts?  When you're staring at freshly fallen snow on the ground, are you tempted to stick out your tongue and taste it?  (Jellyby likes nothing more than to eat fresh snow!) Or are you (like me) a bigger fan of baked goods, fresh from the oven?

Read more...

Tuesday, December 7, 2010

Diary of a Secret Housewife: Raspberry Crumb Bars

The weather has dipped to a ridiculous 30-something degrees here in Boston, and since our thermometer is wonky, I'm usually hobo-ing it up in front of my stove or oven to keep my fingers from going numb.

Of course, I can't stand in front of an empty oven, so I might as well bake something.  And since I had a jar of raspberry jam leftover from the baked sufganiyot, I figured that something might as well be these raspberry crumb bars from Martha's Baking Handbook.


These raspberry crumb bars taste -- and look -- kind of like a summer day: a layer of tart jam (or chocolate, caramel, or lemon curd -- your imagination's the limit) sandwiched between a layer of crispy shortbread and a melt-in-your-mouth shortbread crumble.  It's like a decadent fruit cobbler in bar form.

They require a little bit of effort, in that you have to cut the butter into the dough mixture by hand using a pastry blender, but I find that kind of work very satisfying.  Plus you get a good upper-body work out, which absolves you from any guilt you might feel eating a whole platter of these bars.  Of course, if you're feeling lazy, no one will know if you use a food processor.


Recipe adapted from Martha Stewart's Baking Handbook.  My changes are in italics.

Ingredients:


  • 3 sticks (1 1/2 cups) unsalted butter, room temperature, cut into pieces, plus more for pan
  • 2 1/4 cups (11 ounces) blanched almonds, very finely ground (or sub with almond flour)
  • 3 cups all-purpose flour
  • 1 1/4 cups sugar
  • 1/2 teaspoon salt
  • 1 3/4 cups raspberry, apricot or strawberry jam
Directions:

Preheat the oven to 350.  Butter a 15-by-10-inch rimmed baking sheet.  Line with parchment paper, leaving a 1-inch overhang on the long sides.  Set aside.

In a large bowl, whisk together ground almonds, flour, sugar, and salt.  Cut in the butter with a pastry blender until the mixture resembles coarse crumbs.  using your fingers, squeeze the mixture together to create pea-size crumbs with a few larger clumps.

Transfer half of crumb mixture (about 4.5 cups) to prepared baking sheet; set aside remaining mixture.  Cover with a sheet of parchment paper.  Using the back of a large spoon, press dough evenly into pan, lifting the parchment occasionally to ensure it doesn't stick.  With a wine bottle or small rolling pin, roll along the length of the pan to smooth dough.  Dough should be firmly packed, with no holes or cracks.  Bake, rotating the pan halfway through, until lightly golden all over, 15 to 10 minutes.  Transfer pan to a wire rack to cool completely.

Evenly spread jam (or a layer of caramel, chocolate, or lemon curd) over cooled crust.  Scatter with remaining crumb mixture, squeezing some of the mixture so that large clumps are visible and evenly distributed over the top of the jam.  Bake, rotating the pan halfway through, until the topping begins to turn light golden brown (the jam should not be too dark), 20 to 22 minutes.  Transfer pan to a wire rack to cool completely.

Run a knife around the edges of the pan to loosen; using two wide spatulas, transfer to a cutting board and cut into 3-by-2-inch bars.  (Removal should be easy because of the parchment "handles.")  Bars can be kept in an airtight container at room temperature for up to 4 days.

Read more...

Thursday, December 2, 2010

Diary of a Secret Housewife: Baked Sufganiyot

Every once in a while, I'm reminded of how fitting it is that I became Jewish.  I mean, what you have in Judaism is a culture that celebrates one of its most important holidays by frying everything in sight.

That is awesome.

But every year there comes a point in which even the greasiest lover of grease among us becomes a little bit repulsed by things fried.  That point usually comes after standing in front of the stove for hours frying latke after latke until every surface in the kitchen -- and every bit of one's clothing, skin, and being -- is coated with grease.  And when you get to that point when you feel like you've been immersed in one big fryolator, the very thought of heating up one more vat of oil makes you want to run out the kitchen screaming.

That is when you should make these baked donuts.


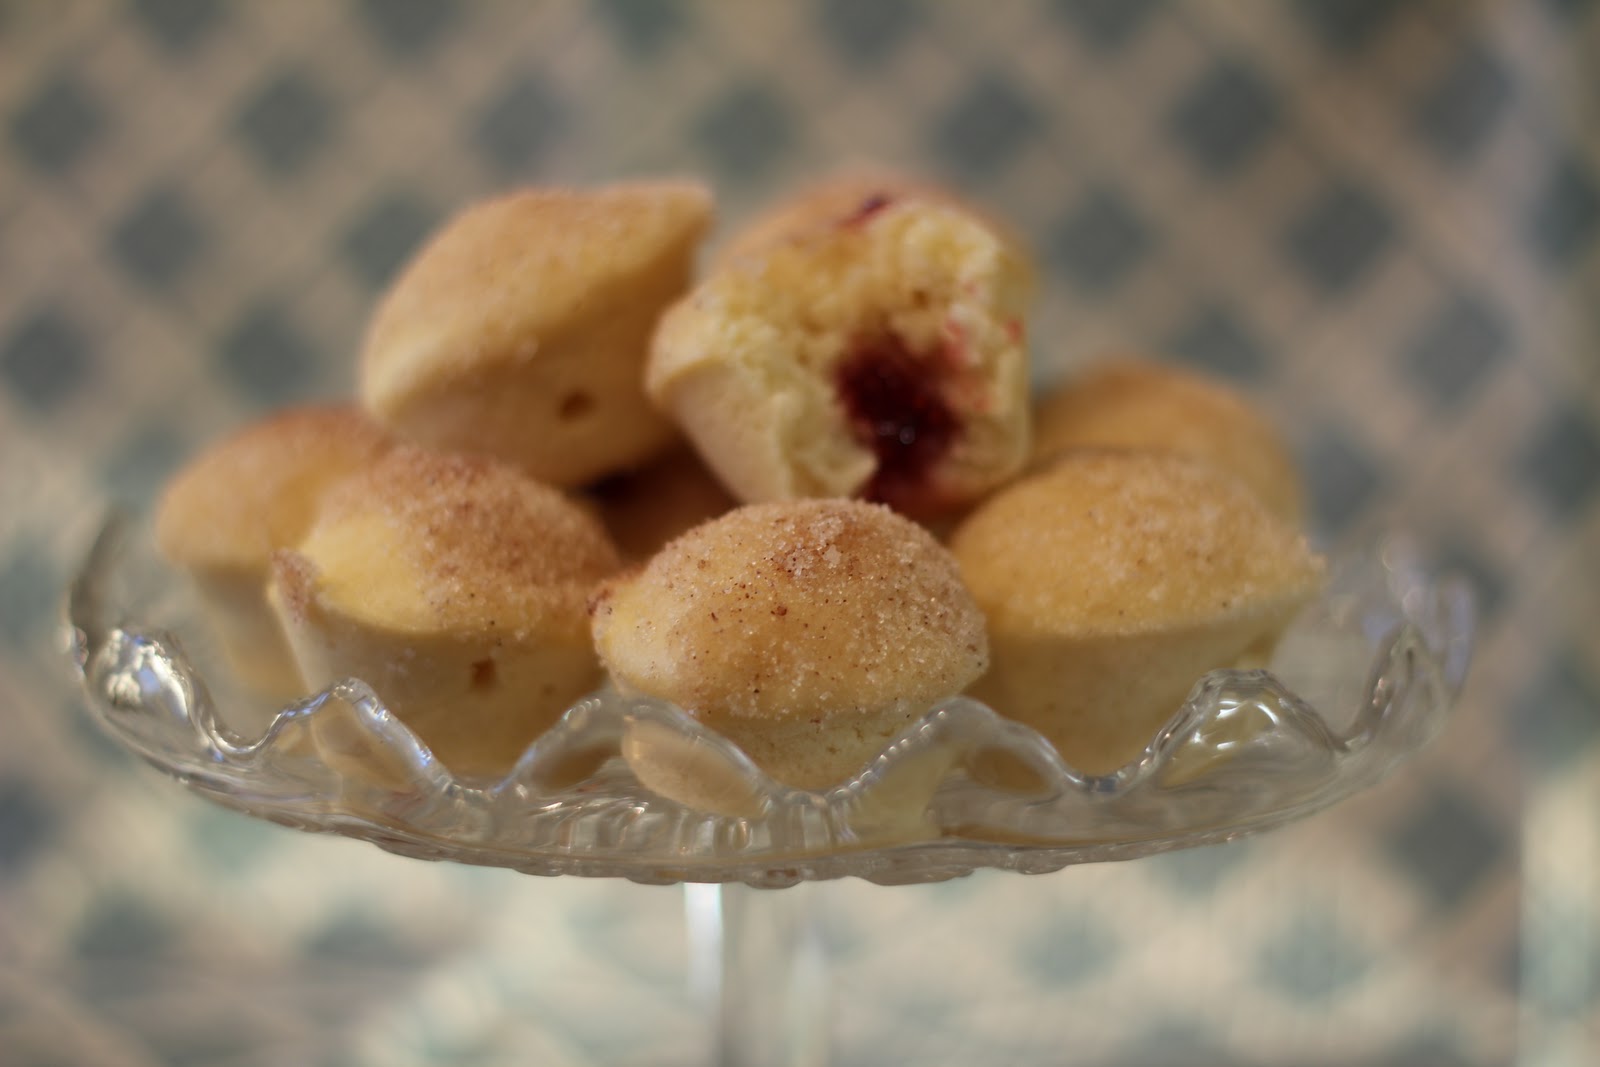
Sufganiyot are Israeli donut balls, commonly filled with jelly (though there are lots of different yummy fillings nowadays), that are traditionally eaten during Hanukkah.  They are usually deep-fried, but I came across this recipe on Baking Bites that calls for baking them.  The result is a mini-muffin (or donut hole) that tastes a lot like a sufganiyot or a chewier, denser cinnamon-sugar donut.


Not being fried, the sufganiyot came out of the oven a bit paler than I expected.  But whereas the baked version doesn't visually compare with the original, taste and texture-wise, it came a lot closer than I expected.  In fact, the cinnamon-sugar topping gives it a crunch that is textually similar to a fried donut.

The following recipe is adapted from Baking Bites.  My changes and additions are in italics.


Ingredients:
1 1/2 cups all purpose flour
2 tsp baking powder
1/4 tsp salt
3/4 cup sugar
1 large egg
1/4 cup vegetable oil
1 tsp vanilla extract
3/4 cup buttermilk
2 tbsp orange zest

2 tbsp butter, melted
1/2 cup sugar
1/8 cup cinnamon (or more, if desired)
2/3 cup red jam (raspberry, strawberry, etc.)

Directions:
Preheat oven to 350F. Lightly grease a mini muffin tin with cooking spray or vegetable oil.

In a small bowl, whisk together flour, baking powder and salt.

In a large bowl, beat together sugar and egg until light in color. Beat in vegetable oil and vanilla extract. Gradually add in flour mixture in two or three additions, alternating with additions of buttermilk.  Then add in the zest, mixing until all the ingredients have come together.

Divide batter evenly into prepared mini muffin cups, filling each about 3/4 full (approx 1 tbsp batter).
Bake for 9-11 minutes, until a tester inserted into the center comes out clean.

Place melted butter in a small bowl. Mix together the cinnamon and sugar and place the mixture for rolling in a small bowl or deep-sided plate.  


Remove donuts from pan, dip the tops in melted butter and roll in cinnamon sugar. Place on a cooling rack to allow sugar to set.

When donuts are cooled, fit a pastry bag with small round pastry tip. Place jam into pastry bag. Poke a small hole in the side (or bottom) of each donut with the pastry tip and pipe a small amount of jam into the center of each donut (approx 1 tsp).

Serve immediately.

Read more...

Saturday, November 27, 2010

Diary of a Secret Housewife: Mini Pumpkin Whoopie Pies with Bourbon Cream Cheese Frosting

I have an anti-American admission: I'm not a big pumpkin fan.  So the whole prospect of a holiday table organized around a dry turkey and a gummy pumpkin pie didn't excite me.  But when you invite people over for Thanksgiving, they expect pumpkin, and you can't send them away disappointed, can you?

I can't.


So I made mini pumpkin whoopie pies.  Because in my mind miniaturizing anything makes it irresistible, as does adding cream cheese frosting.  And bourbon.


My recipe is adapted from Matt Lewis's pumpkin whoopie pie recipe (from the Martha Stewart website); my additions/changes are in italics.


Ingredients (makes about 30 mini whoopie pies):

For the pumpkin whoopie cookies:
  • 3 cups all-purpose flour
  • 1 teaspoon salt
  • 1 teaspoon baking powder
  • 1 teaspoon baking soda
  • 2 tablespoons ground cinnamon
  • 1 tablespoon ground ginger
  • 1 tablespoon ground cloves
  • 2 cups firmly packed dark-brown sugar
  • 1 cup vegetable oil
  • 3 cups pumpkin puree, chilled
  • 2 large eggs
  • 1 teaspoon pure vanilla extract
For the bourbon cream cheese filling:
  • 3 cups confectioners' sugar
  • 1/2 cup (1 stick) unsalted butter, softened
  • 8 ounces cream cheese, softened
  • 2 teaspoons bourbon (or replace with 1-2 teaspoons vanilla extract if desired)
Directions:

Make the cookies: Preheat oven to 350 degrees. Line two baking sheets with parchment paper or a nonstick baking mat; set aside.

In a large bowl, whisk together flour, salt, baking powder, baking soda, cinnamon, ginger, and cloves; set aside. In another large bowl, whisk together brown sugar and oil until well combined. Add pumpkin puree and whisk until combined. Add eggs and vanilla and whisk until well combined. Sprinkle flour mixture over pumpkin mixture and whisk until fully incorporated.

Using a small ice cream scoop with a release mechanism, drop heaping tablespoons of dough onto prepared baking sheets, about 1 inch apart.  (I found that it was easier to create well-formed circles if I piped the dough.  If you have a real piping bag, use that, but if not, a ziploc bag snipped at a corner will do just fine.) Transfer to oven and bake until cookies are just starting to crack on top and a toothpick inserted into the center of each cookie comes out clean, about 15 minutes (for regular-sized cookies) and 13-14 minutes for mini cookies. Let cool completely on pan.

Make the filling: Sift confectioner' sugar into a medium bowl; set aside. In the bowl of an electric mixer fitted with the paddle attachment, beat butter until smooth. Add cream cheese and beat until well combined. Add confectioners' sugar and vanilla (or bourbon, if using), beat just until smooth. (Filling can be made up to a day in advance. Cover and refrigerate; let stand at room temperature to soften before using.)

Assemble the whoopie pies: Line a baking sheet with parchment paper and set aside. Transfer filling to a disposable pastry bag and snip the end. When cookies have cooled completely, pipe a large dollop of filling on the flat side of half of the cookies. Sandwich with remaining cookies, pressing down slightly so that the filling spreads to the edge of the cookies. Transfer to prepared baking sheet and cover with plastic wrap. Refrigerate cookies at least 30 minutes before serving and up to 3 days.


Enjoy!

Read more...

Saturday, November 6, 2010

Diary of a Secret Housewife: Chocolatey Mocha Cake with Chocolate Cream Cheese Frosting

I had a realization -- nay, an epiphany -- yesterday when I made a cake for a party to celebrate the imminent arrival of friend Laura's second baby.  I've always maintained that red velvet is my favorite cake flavor.  BUT what I realized yesterday is that when I say "red velvet" is my favorite, what I'm really saying is "Give me a tub of cream cheese icing, stat."


That's right.  All this time I was thinking what I loved about red velvet cake is its red velvetness, what I really craved was its cream cheesiness.  And that cream cheesiness can be attained with any cake, including the truly spectacular and moist Ina Garten "double chocolate layer cake," which, trust me, you really must make.  Today.


I made said chocolate cake, but I decided not to use the (delicious) mocha frosting that was part of the recipe because the frosting involved a raw egg yolk.  Raw egg yolk + pregnant lady = potential badness. So I improvised my own frosting.  And if I can just toot my own horn for a moment -- toot toot -- the improvised frosting is pretty damn good.  And it only involves three steps:

1. Mix one 8 oz. package of cream cheese (room temperature) with 1/4 cup of butter (room temperature) until smooth and creamy.

2. Slowly add in 3 cups of confectioner's sugar.  You can decrease the amount of sugar if you don't mind a more melty frosting.

3. Add in 3/4 cup of high quality unsweetened cocoa powder.

That's it!  Easy.  Delicious.  You'll stick your head in the bowl and lick it.  It's that awesome.

I will never need to eat red dye again.  Bye bye red velvet!  Hello cream cheese heaven.

Read more...

Thursday, October 28, 2010

When life hands you lemons, make lemon rolls.

My husband and I once found ourselves stranded at the Minneapolis airport.  We had two choices for entertainment: play footsies with a senator in the men's room or cruise the food court.  We chose the latter.  

This happened to be a good choice, not only because glory holes in airport men's restrooms seem rather unhygienic, but also because the airport food court turned out to be the regional training center for Cinnabun.  We pressed our faces against the glass, watching Cinnabun trainees schmear gallons of cinnamon sugar and ginormous blocks of butter on dough.  Many people would have gone into sugar-shock just looking at the process, but I couldn't wait to get my hands on a fresh butter block Cinnabun.

I was reminded of this experience recently when considering this amazing sticky lemon roll recipe.  Would it involve industrial-sized blocks of butter?  Would it be delectable?  Would it make Larry Craig horny?

Sticky Lemon Rolls

Surprisingly, the recipe was more restrained than I expected.  Yes, there's cream cheese and butter and sugar, but not so much that I felt guilty serving . . . or eating it.  Plus I made the rolls with wheat flour (I ran out of AP flour), so in my mind, that makes the rolls healthy.

In any event, they are delicious.  Not too much work.  So bright with the scent and tanginess of the lemons.  And the glaze . . . ah the cream cheese glaze . . . is amazing.

Makes 12 large breakfast rolls

Lemon Roll Dough
  • 1 envelope (0.25 ounces, or 2 1/2 teaspoons) yeast

  • 3/4 cup milk, warmed to about 100°F or warm but not hot on your wrist
  • 1/2 cup (1 stick) unsalted butter, very soft
  • 1/4 cup white sugar
  • 2 teaspoons vanilla extract
  • 4 1/2 cups flour
  • 1/2 teaspoon salt
  • 1/2 teaspoon nutmeg
  • 2 lemons, zested
  • 2 eggs
  • Sticky Lemon Filling
  • 1 cup sugar
  • 1/4 teaspoon freshly-ground nutmeg
  • 1/2 teaspoon powdered ginger
  • 2 lemons, zested and juiced *
  • 3 tablespoons unsalted butter, very soft

Lemon Cream Cheese Glaze
  • 4 ounces cream cheese, softened
  • Juice of 1 lemon
  • 1 cup powdered sugar
  • 1 lemon, zested

In the bowl of a stand mixer sprinkle the yeast over the warmed milk and let it sit for a couple minutes. With the mixer paddle, stir in the softened butter, sugar, vanilla, and one cup of the flour. Stir in the salt, nutmeg, and lemon zest. Stir in the eggs and enough of the remaining flour to make a soft yet sticky dough.

Switch to the dough hook and knead for about 5 minutes, or until the dough is elastic and pliable.
(If you do not have a stand mixer, stir together the ingredients by hand, then turn the soft dough out onto a lightly floured countertop. Knead the dough by hand (see this video for explicit instructions) for 5 to 7 minutes, or until the dough is smooth, pliable, and stretchy.)

Spray the top of the dough with vegetable oil, and turn the dough over so it is coated in oil. Cover the bowl with plastic wrap and a towel and let the dough rise until nearly doubled - about an hour.
In a small bowl, mix the sugar with the nutmeg and ginger, then work in the lemon zest with the tips of your fingers until the sugar resembles wet, soft sand. Stir in the juice of 1 lemon. (Reserve the juice of the second lemon for the glaze.)

Lightly grease a 13x9 inch baking dish with baking spray or butter. On a floured surface pat the dough out into a large yet still thick rectangle — about 10x15 inches. Spread evenly with the softened butter, then pour and spread the lemon-sugar mixture over top. Roll the dough up tightly, starting from the top long end. Cut the long dough roll into 12 even rolls, and place them, cut side up, in the prepared baking dish.

Cover the rolls with a towel and let them rise for an hour or until puffy and nearly doubled. (You can also refrigerate the rolls at this point. Cover the pan tightly with plastic wrap, and place it in the refrigerator for up to 24 hours. When you are ready to bake the rolls, remove the pan from the fridge, and let them rise for an hour.)

Heat the oven to 350°F. Place the risen rolls in the oven and bake for 35 minutes or until a thermometer inserted into a center roll reads 190°F.

While the rolls are baking, prepare the glaze. In a small food processor (or with a mixer, or a sturdy whisk), whip the cream cheese until light and fluffy. Add the lemon juice and blend until well combined. Add the powdered sugar and blend until smooth and creamy.

When the rolls are done, smear them with the cream cheese glaze, and sprinkle the zest of 1 additional lemon over top to garnish. Serve while warm.

Read more...

Sunday, October 24, 2010

A chocolate-licious birthday for my husband!

A certain somebody turned 35 today.  And that's worth making the most decadent cake ever -- chocolatey, not too sweet, with a subtle trace of coffee flavor.


The recipe is Ina Garten's.  It can't be an easier recipe to follow (just don't forget to add baking soda, as I did the first time).  And your spouse will swoon with happiness, and your guests will lick their forks and the cake plate when they think you're not looking.

Double Chocolate Layer Cake


  • 1 3/4 cups all-purpose flour, plus more for dusting
  • 2 cups sugar
  • 3/4 cup unsweetened cocoa powder
  • 2 teaspoons baking soda
  • 1 teaspoon baking powder
  • 1 teaspoon kosher salt
  • 1 cup buttermilk
  • 1/2 cup vegetable oil
  • 2 large eggs
  • 1 teaspoon pure vanilla extract
  • 1 cup freshly brewed hot coffee
  • Frosting
  • 6 ounces semisweet chocolate, coarsely chopped
  • 2 sticks (1/2 pound) unsalted butter, at room temperature
  • 1 large egg yolk
  • 1 teaspoon pure vanilla extract
  • 1 cup plus 1 tablespoon confectioners' sugar, sifted
  • 1 tablespoon instant coffee granules


Preheat the oven to 350°. Butter two 8-inch round cake pans and line them with parchment paper; butter the paper. Dust the pans with flour, tapping out any excess.

In the bowl of an electric mixer fitted with a paddle, mix the flour with the sugar, cocoa powder, baking soda, baking powder and salt at low speed. In a medium bowl, whisk the buttermilk with the oil, eggs and vanilla. Slowly beat the buttermilk mixture into the dry ingredients until just incorporated, then slowly beat in the hot coffee until fully incorporated.

Pour the batter into the prepared pans. Bake for 35 minutes, or until a toothpick inserted in the center of each cake comes out clean. Let the cakes cool in the pans for 30 minutes, then invert the cakes onto a rack to cool completely. Peel off the parchment paper.

In a microwave-safe bowl, heat the chocolate at high power in 30-second intervals, stirring, until most of the chocolate is melted. Stir until completely melted, then set aside to cool to room temperature.

In the bowl of an electric mixer fitted with a paddle, beat the butter at medium speed until pale and fluffy. Add the egg yolk and vanilla and beat for 1 minute, scraping down the side of the bowl. At low speed, slowly beat in the confectioners' sugar, about 1 minute. In a small bowl, dissolve the instant coffee in 2 teaspoons of hot water. Slowly beat the coffee and the cooled chocolate into the butter mixture until just combined.

Set a cake layer on a plate with the flat side facing up. Evenly spread one-third of the frosting over the cake to the edge. Top with the second cake layer, rounded side up. Spread the remaining frosting over the top and side of the cake. Refrigerate for at least 1 hour before slicing.

MAKE AHEAD
The frosted cake can be refrigerated for 2 days. Let stand for 1 hour before serving.

Read more...

Tuesday, September 28, 2010

Diary of a Secret Housewife: Momofuku Milk Bar's Crack Pie

Momofuku Milk Bar's Crack Pie raises a series of pressing questions: Will you gain 100 times the calories for eating crack pie than cocaine pie?  Would Whitney smoke this?  Most importantly, what kind of mystical pie experience is worth $44?  That's right.  $44.  For something that does not include any substances that can't be readily found in your fridge and pantry.

I had to know the answers to these mysteries.

So I made Crack Pie.  Twice.


And I am here to tell you that crack ain't whack.  

I mean, I wouldn't spend $44 on it.  But it's pretty damn good.


Momofuku's Crack Pie is basically a take on an old Southern dessert, Chess Pie.  It's sugar, cream, and butter baked in a cookie crust.  Momofuku's secret is a delicious, slightly salty fresh oatmeal cookie base and a bit of milk powder to enhance the flavoring of the gooey, butterscotch-like filling.  It's quite easy to make, though it takes multiple steps and a bit of cooling time.

Here's what you need for 1 pie:

Oat Cookie Crust
  • Nonstick vegetable oil spray
  • 9 tablespoons (1 stick plus 1 tablespoon) unsalted butter, room temperature, divided
  • 5 1/2 tablespoons (packed) golden brown sugar, divided
  • 2 tablespoons sugar
  • 1 large egg
  • 3/4 cup plus 2 tablespoons old-fashioned oats
  • 1/2 cup all purpose flour
  • 1/8 teaspoon baking powder
  • 1/8 teaspoon baking soda
  • 1/4 teaspoon (generous) salt
Filling

  • 3/4 cup sugar
  • 1/2 cup (packed) golden brown sugar
  • 1 tablespoon nonfat dry milk powder
  • 1/4 teaspoon salt
  • 1/2 cup (1 stick) unsalted butter, melted, cooled slightly
  • 6 1/2 tablespoons heavy whipping cream
  • 4 large egg yolks
  • 1 teaspoon vanilla extract
  • Powdered sugar (for dusting)


You begin by making the oatmeal cookie crust.  Preheat oven to 350°F. Line 13x9x2-inch metal baking pan with parchment paper; coat with nonstick spray. Combine 6 tablespoons butter, 4 tablespoons brown sugar, and 2 tablespoons sugar in medium bowl. Using electric mixer, beat mixture until light and fluffy, occasionally scraping down sides of bowl, about 2 minutes. Add egg; beat until pale and fluffy. Add oats, flour, baking powder, baking soda, and salt and beat until well blended, about 1 minute. Turn oat mixture out onto prepared baking pan; press out evenly to edges of pan. Bake until light golden on top, 17 to 18 minutes. Transfer baking pan to rack and cool cookie completely.


Using hands, crumble oat cookie into large bowl; add 3 tablespoons butter and 1 1/2 tablespoons brown sugar. Rub in with fingertips until mixture is moist enough to stick together. Transfer cookie crust mixture to 9-inch-diameter glass pie dish. (I didn't have a glass pie dish, so I used cake pans the first time and a ceramic pie dish the second time.)  Using fingers, press mixture evenly onto bottom and up sides of pie dish. Place pie dish with crust on rimmed baking sheet.


Tip: As you can see, you'll essentially be baking the oatmeal cookie twice, the first time on its own, the second time crushed and made into the pie crust.  So don't overbake the cookie the first time, or else the crust will burn while the filling is being cooked.


Next, you make the filling.  Position rack in center of oven and preheat to 350°F. Whisk both sugars, milk powder, and salt in medium bowl to blend. Add melted butter and whisk until blended. Add cream, then egg yolks and vanilla and whisk until well blended. Pour filling into crust. Bake pie 15 to 20 minutes (filling may begin to bubble). Reduce oven temperature to 325°F. Continue to bake pie until filling is brown in spots and set around edges but center still moves slightly when pie dish is gently shaken, about 10 to 20 minutes longer. 


Tip: The second time I made the pie, I baked it according to Bon Appetit's instructions (30 min. at 350, then 20 min. at 325) and, as you can see from the photo, nearly burnt the pie.


The first time I made the pie, however, I followed the instructions on the LA Times website, and the pie came out perfect, if not just slightly underbaked.  The underlined time recommendations above are my own, based upon trial and error; they represent a middle range from both the Bon Appetit and the LA Times recipes.


When the pie has finished baking, cool pie 2 hours in pie dish on rack. Chill uncovered overnight.  Can be made 2 days ahead. Cover; keep chilled.

Sift powdered sugar lightly over top of pie. Cut pie into wedges and serve cold.


Prepare for shivers of delight.

Oh, the pie is VERY sweet, and VERY gooey.  It's not right for everyone's palate.  I'd suggest cutting small pieces to start and serving it with a high-quality vanilla ice cream to cut the sweetness.

If you like it, feel free to send $43 my way.

Read more...

Tuesday, September 14, 2010

Diary of a Secret Housewife: Rosh Hashanah Honey Cake

This year, we had a fairly low-key celebration of the Jewish New Year, but one thing I do every year, regardless of how many people are coming over for dinner, is make a honey cake.  If you're one of those people who cringe at the thought of a sweet and spicy cake, I'm with you: I'm no big fan of cinnamon (unless it's in the form of a Cinnabon), and I generally dislike cloves, allspice . . . you know, the "apple pie" spices.

But this honey cake is so majestic, so moist that each year I put aside my spice prejudices and make it.  Oh, in fact, it's called "Majestic and Moist New Year's Honey Cake," and it's from Marcy Goldman, who is also responsible for Caramel Chocolate Matzoh Crunch (a.k.a. matzoh crack).


I used Goldman's batter to make cupcake-sized cakes this year, as cupcakes are faster to bake and easier to give away as gifts.  The recipe yields a very liquidy batter, but the result is a cake that is as melt-in-your-mouth on day one as it is on day four.


I served the cupcakes with a little margarine and honey.  They are plenty sweet already, but if you want a sweet new year, you gotta go all out, right?!


Here's the recipe:

Ingredients:
  • 3 1/2 cups all-purpose flour
  • 1 tablespoon baking powder
  • 1 teaspoon baking soda
  • 1/2 teaspoon salt
  • 4 teaspoons ground cinnamon
  • 1/2 teaspoon ground cloves
  • 1/2 teaspoon ground allspice
  • 1 cup vegetable oil
  • 1 cup honey
  • 1 1/2 cups granulated sugar
  • 1/2 cup brown sugar
  • 3 eggs
  • 1 teaspoon vanilla extract
  • 1 cup warm coffee or strong tea (For a Chewish twist, I used a Vietnamese coffee that my mom brought back for me from Saigon.)
  • 1/2 cup fresh orange juice
  • 1/4 cup rye or whisky 
  • 1/2 cup slivered or sliced almonds 

Goldman recommends using a 9-inch angel food cake pan, but says that you can also make it in a 10-inch tube or bundt cake pan, a 9 by 13-inch sheetpan, or three 8 by 4 1/2-inch loaf pans.  (I used a muffin pan that yields 12 cupcakes.)

Preheat the oven to 350°F.  Lightly grease the pan(s).  For tube and angel food pans, line the bottom with lightly greased parchment paper.  For gift honey cakes, Goldman uses "cake collars" (available from Sweet Celebrations) designed to fit a specific loaf pan. These give the cakes an appealing, professional look.

In a large bowl, whisk together the flour, baking powder, baking soda, salt, and spices. Make a well in the center and add the oil, honey, sugars, eggs, vanilla, coffee, orange juice, and rye or whisky.

Using a strong wire whisk or an electric mixer on slow speed, combine the ingredients well to make a thick batter, making sure that no ingredients are stuck to the bottom of the bowl.

Spoon the batter into the prepared pan(s) and sprinkle the top of the cake(s) evenly with the almonds. Place the cake pan(s) on 2 baking sheets stacked together and bake until the cake springs back when you touch it gently in the center. For angel and tube cake pans, bake for 60 to 70 minutes; loaf cakes, 45 to 55 minutes. For sheet-style cakes, the baking time is 40 to 45 minutes. This is a liquidy batter and, depending on your oven, it may need extra time. Cake should spring back when gently pressed.

Let the cake stand for 15 minutes before removing it from the pan. Then invert it onto a wire rack to cool completely.

Note: If you prefer not to use the whisky, replace it with orange juice or coffee.

Chewish or not, make this cake.  You'll love it. A belated l'shana tova to all!

Read more...

Thursday, July 15, 2010

Diary of a Secret Housewife: Caramel Banana Cake

As you might remember, my niece was born last week.  And in honor of her arrival, I wanted to make something nearly as sweet and delicious as her.

The Kitchn came to the rescue with a caramel banana cake that is just to die for.  The result is a gooey, delectable heaven of a dessert that's as much pudding as cake.  The caramel adds an unexpectedly sophisticated, smoky taste that pairs really well with the fragrance and sweetness of banana.


The Kitchn recipe makes two cakes.  I didn't want to be tooooo indulgent, so I just halved the recipe.  Here's what you need for my halved version:

3/8 cup butter
1/2 cup white sugar
1/2 cup brown sugar
2 eggs
1 1/2 cups all-purpose flour
3/4 teaspoons baking soda
1/4 teaspoon salt
3/4 cups milk 
3/4 cups mashed bananas
3/4 cups caramel sauce (recipe here)


Heat oven to 325 F. Grease a 9" cake pan.

"Cream the butter and sugar until fluffy then add the eggs and beat until silky and lightened. Sift the flour with the baking soda and salt. Whisk the milk and mashed bananas in a separate measuring cup and add to the eggs and butter, alternating with the flour. Beat just until smooth.

Pour batter into the prepared pans. Pour half the caramel sauce into each pan, and swirl with a knife. Put in the oven carefully and bake for about 60 minutes, or until the center is set and a knife comes out clean."


You're supposed to let the cake cool before serving.  I dare you.

Read more...
Related Posts with Thumbnails

Doubly Happy on Facebook

  © Blogger templates Psi by Ourblogtemplates.com 2008

Back to TOP